分享使用多年简单高效的 spring boot 模板工程结构
尽管目前市场主流编程语言有很多,但 Java 仍然是企业的使用首选,不仅是成长多年,积累了不少 Coder,也在于丰富的开源库,而 spring 全家桶仍然非常流行,本篇文章结合作者多年使用,总结的一个简单的 spring boot 模板结构,具有以下优缺点:
优点:
- 干净清爽,不依赖任何第三方库,适合手工码字人
- 一个的业务处理入口(Controller),避免入口泛滥在应用中的各个地方
- 异常处理、响应结果、摘要日志、鉴权部分的预留等等,同样是避免切面膨胀
- 研发只需关注业务部分代码的开发,不需要管异常、日志、鉴权等非主流程处理的代码
- 自定义空间大,模板结构保存很多预留位,可自定义扩展
缺点:
- 适用于处理通用HTTP业务请求,JSON格式的请求响应体,对于websocket或上传下载等需另行定义处理
- 业务请求的配置路径在 xml 文件中完成,多人开发容易造成代码冲突
1. 类结构图
1.1. 领域对象
下图主要是领域对象的定义,涵盖异常、错误码与服务结果,错误级别、错误码都是为业务异常服务,出现异常的情况,最终会以正常状态服务结果返回,而不是异常堆栈的直接抛出。
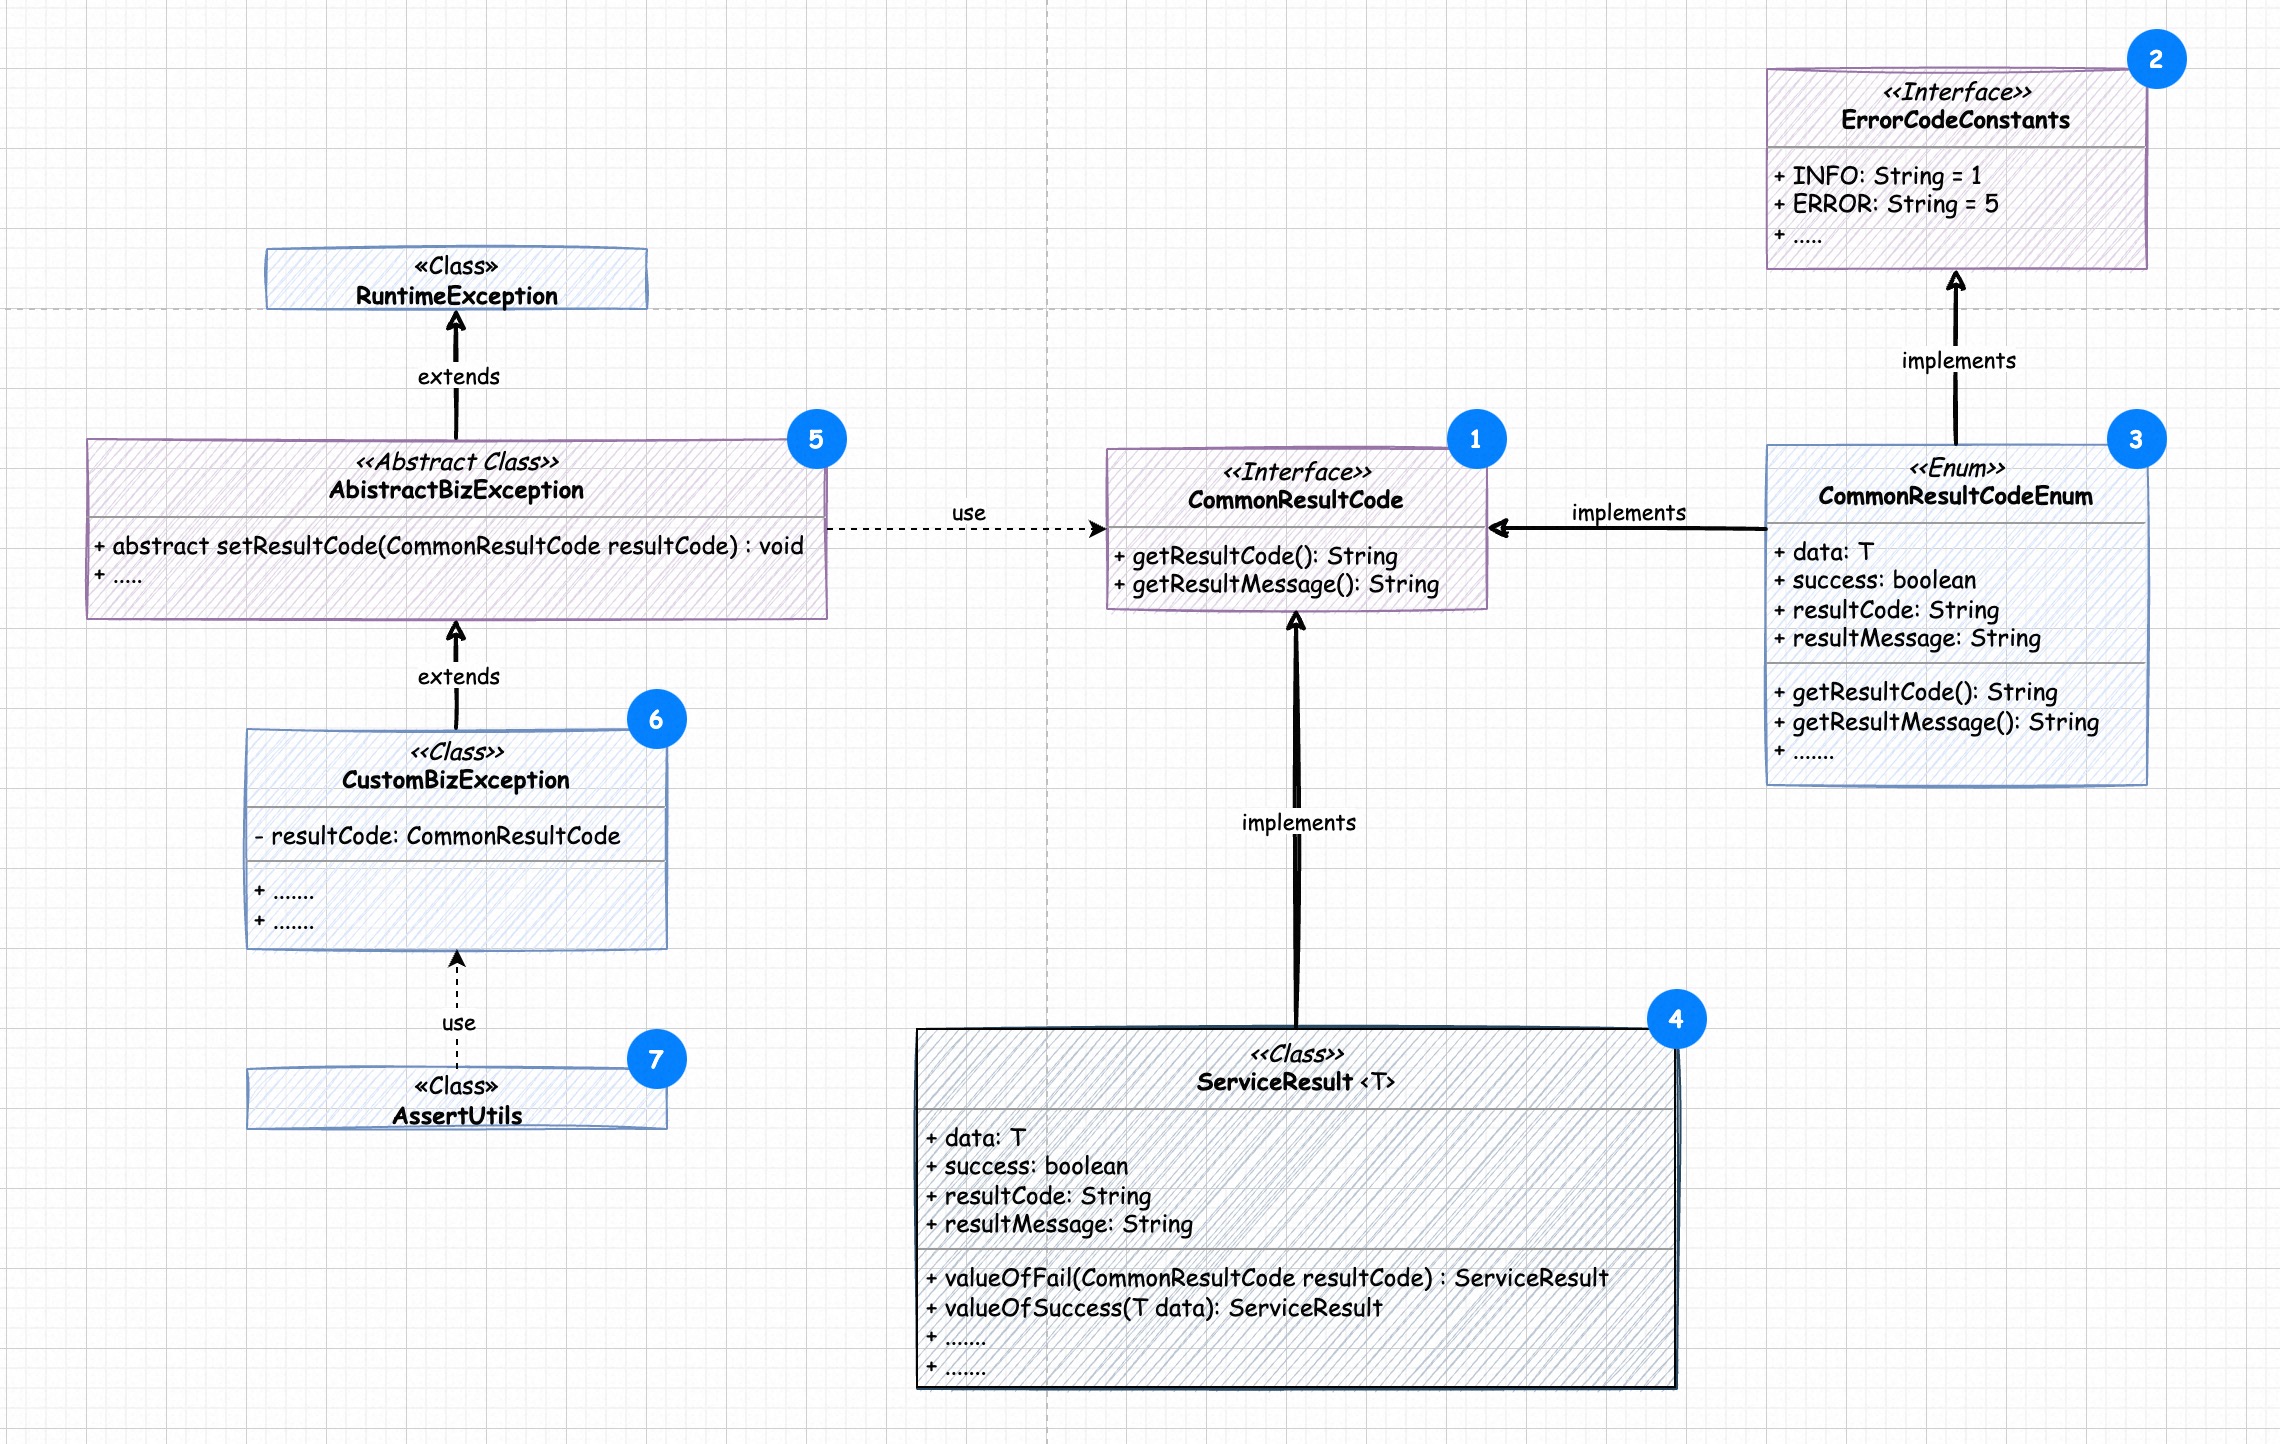
为了更快的创建出模板结构,上面数字代表创建顺序,详细的代码可直接点击查看:
- CommonResultCode,通用的结果定义,用于约束返回内容
- ErrorCodeConstants,错误码常量定义,应结合错误码规范,其中包含错误码前缀、错误级别与业务域的定义
- CommonResultCodeEnum,错误码枚举类的定义,因实现了
CommonResultCode与ErrorCodeConstants,只需定义自己的四位错误码 - ServiceResult,响应结果,贯穿整条业务请求,其中定义约束了返回结构,应遵循各自的前后端交互规范
- AbstractBizException,抽象的业务异常对象,由自定义异常继承
- CustomBizException,自定义的业务异常,需继承
AbstractBizException - AssertUtils,断言工具类,与
AbstractBizException绑定,业务开发中不必if...else...判断,使用此工具直接抛
完成上面领域对象的定义,在 applicationContext.xml 中配置个异常的 Bean 对象,具体可以看AssertUtils类注释,第一步完成。
<bean class="com.xxx.xxx.exception.AssertUtils">
    <property name="exceptionClassName" value="com.xxx.xxx.exception.CustomBizException"/>
</bean>
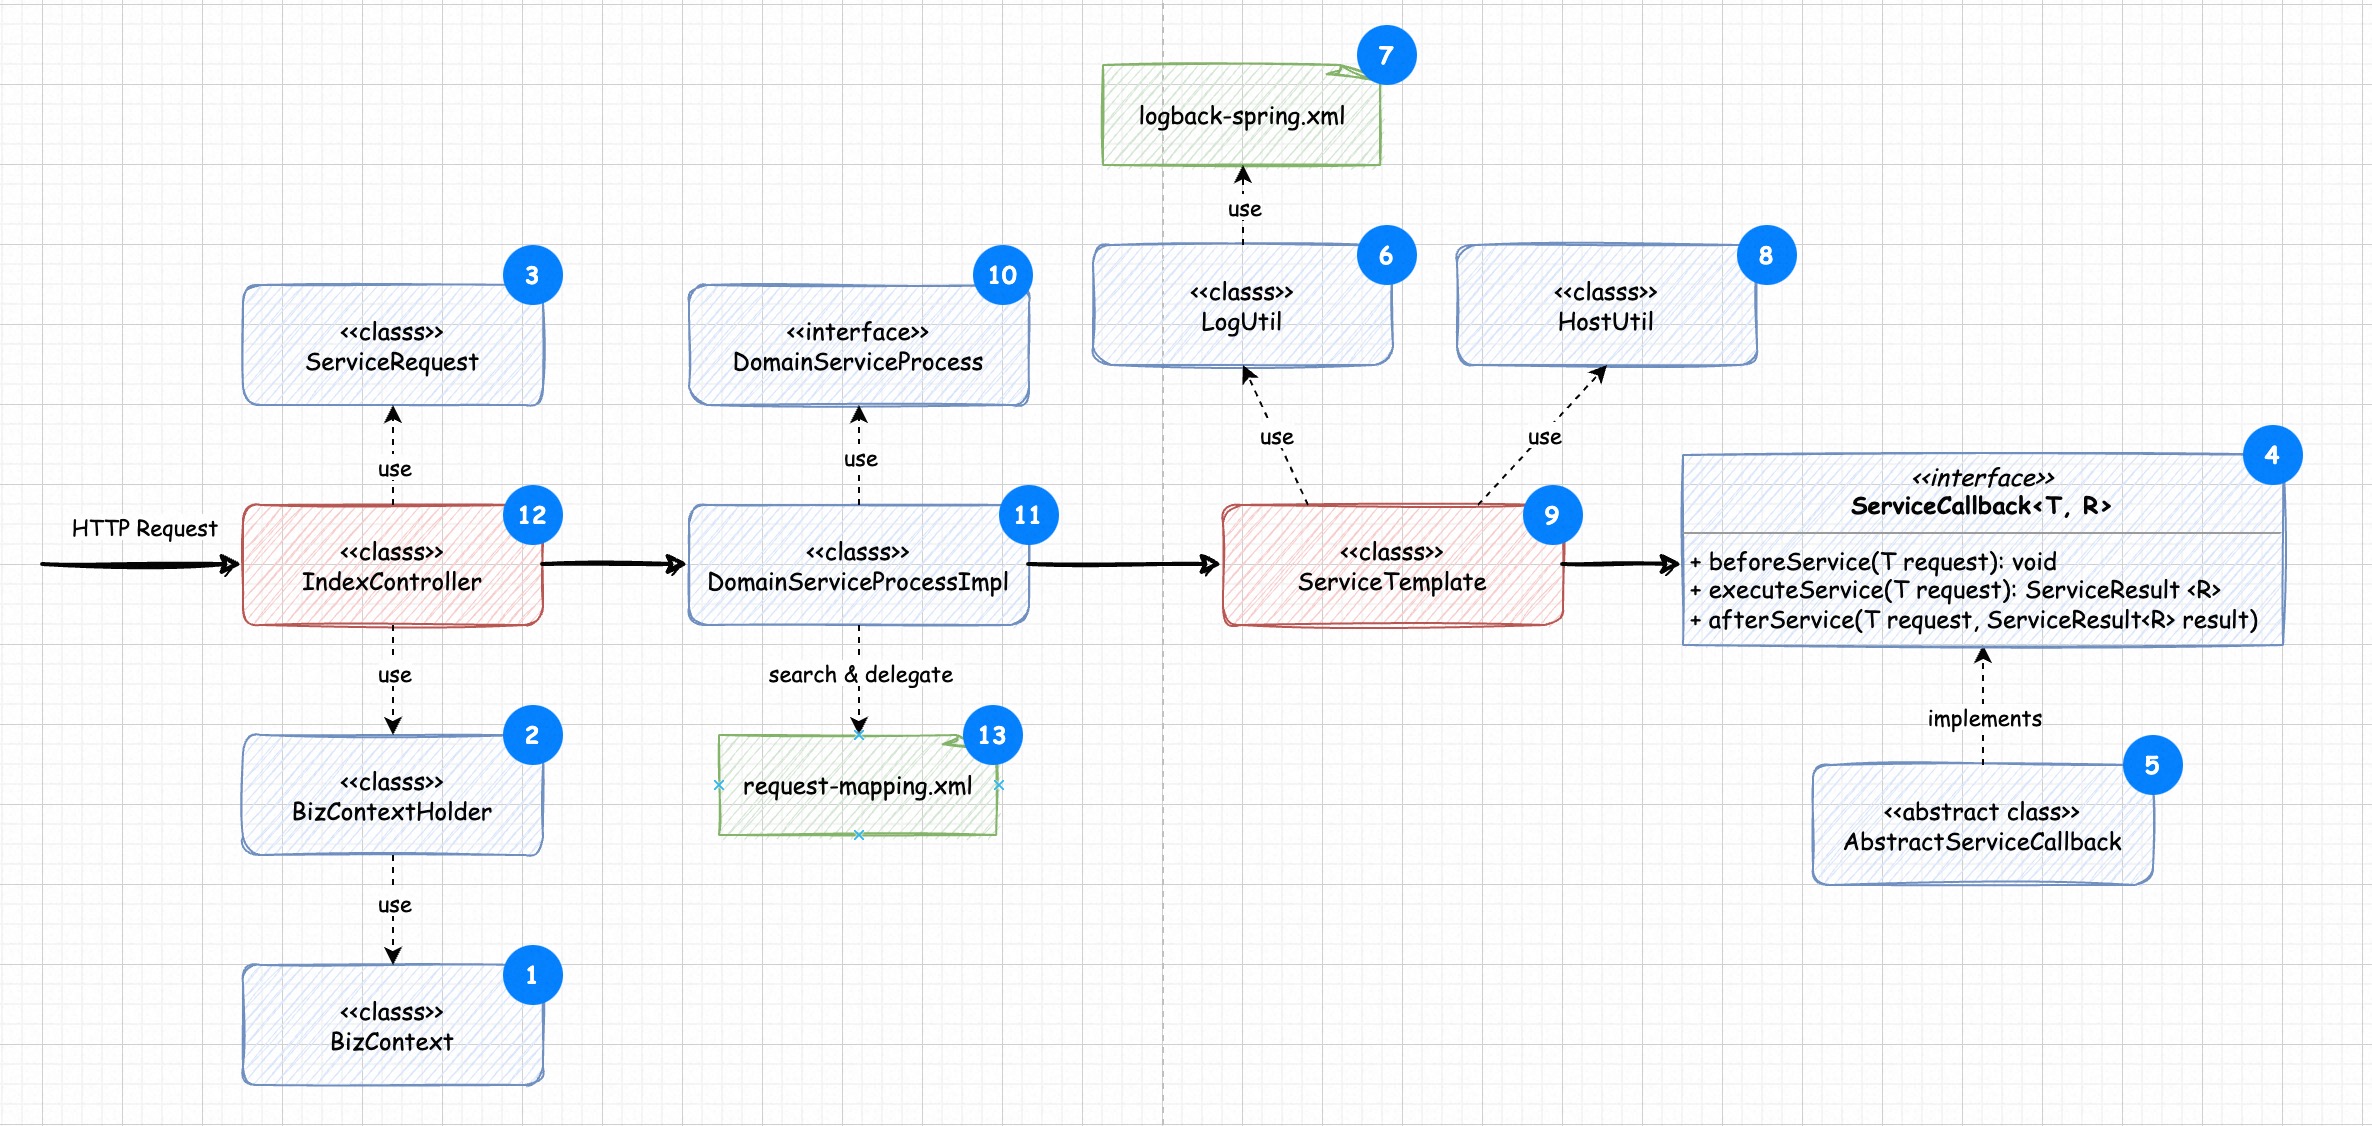
1.2. 请求委派
领域对象贯穿业务请求的生命周期,对于每个请求的的扭转委派,如下图定义:
尽管已经最小化,为了简单,仍然用了一些工具类的包,提前配置在 pom.xml 文件中,如下:
<!-- JSON格式处理 -->
<dependency>
    <groupId>com.alibaba</groupId>
    <artifactId>fastjson</artifactId>
    <version>1.2.65</version>
</dependency>

<!-- 工具包 -->
<dependency>
    <groupId>org.apache.commons</groupId>
    <artifactId>commons-lang3</artifactId>
    <version>3.8.1</version>
</dependency>

<!-- 日志 -->
<dependency>
    <groupId>org.slf4j</groupId>
    <artifactId>slf4j-api</artifactId>
    <version>2.0.10</version>
</dependency>
按上图步骤,依次创建的类如下:
- BizContext,业务上下文,存储在请求中的数据,使用 ThreadLocal 承载
- BizContextHolder,业务上下文的处理类,直接面向使用,在其中使用 BizContext 承载数据
- ServiceRequest,封装请求数据的对象
- ServiceCallback,服务回调接口,其中包含三个方法,前置、后置与核心处理
- AbstractServiceCallback,抽象的服务回调接口,由具体业务实现
- LogUtil,一个内置的日志工具类
- logback-spring.xml,日志配置文件,其中有需要配置的APPENDER
- HostUtil,主机IP的工具类
- ServiceTemplate,核心服务模板
- DomainServiceProcess,领域服务接口
- DomainServiceProcessImpl,领域服务接口实现,用于请求寻址,委派到匹配指定的服务对象
- IndexController,统一的请求入口
- request-mapping.xml,根据请求路径配置业务处理类
至此所有模板代码已创建完成,下面看如何使用。
2. 模板使用
2.1. 编写服务
DelUser,继承AbstractServiceCallback类,必需要实现executeService方法,beforeService和afterService 可选
import com.alibaba.fastjson.JSONObject;
import org.springframework.stereotype.Component;

@Component("deleteUser")
public class DelUser extends AbstractServiceCallback<ServiceRequest, ServiceResult<String>> {

    /**
     * 前置处理(可选的方法),生命周期在 executeService 执行之前
     * 可以做一些参数校验等操作
     *
     * @param request 服务请求对象
     */
    @Override
    public void beforeService(ServiceRequest request) {
        super.beforeService(request);

        // 参数验证
        JSONObject postJson = request.parseData(JSONObject.class);
        AssertUtils.notNull(postJson, CommonResultCodeEnum.PARAM_ILLEGAL, "post data is null");

        Long id = postJson.getLong("id");
        AssertUtils.notNull(id, CommonResultCodeEnum.PARAM_ILLEGAL, "id is null");
    }

    @Override
    public ServiceResult executeService(ServiceRequest request) {
        // 获取返回对象,最终将在 result 的 T data 中呈现
        String resultData = "ok";

        return ServiceResult.valueOfSuccess(resultData);
    }

    /**
     * 后置处理(可选的方法),生命周期在 executeService 执行完后
     * 可以做回收的操作
     *
     * @param request 服务请求对象
     * @param result {@link ServiceResult}
     */
    @Override
    public void afterService(ServiceRequest request, ServiceResult result) {
        super.afterService(request, result);
    }
}
2.2. 注册服务
将上面的服务注册到request-mapping.xml文件中,下面的 entry key 就是要请求的路径,如/api/user/delete
<bean id="domainServiceProcess" class="com.cainiao.moore.template.DomainServiceProcessImpl">
    <property name="serviceMap">
        <map>
            <entry key="api_user_delete"  value-ref="deleteUser"/>
        </map>
    </property>
</bean>
2.3. 服务访问
启动 spring boot 应用, 使用 curl 或者 postman 这样的工具发起请求

3. Conclusion
整个服务模板,搭建起来废点事,但实际使用中,会发现非常简单,继承服务回调类,注册服务,技术只需要在自己的服务中编写业务代码,完全不需要关注日志怎么打,异常怎么处理,上层都已进行了封装。
仁者见仁,智者见智,适合自己的才是最好的
4. 代码及素材
- 完整的代码见 GitHub
- Draw.io 设计稿